
Music Mode
Music Mode is an autopilot for music. Patch your fixtures, group them in zones, play music, and DMX Core lights each zone to the music in the style you pick: calm washes when the music is quiet, chases and flashes when it gets busy, a new look or palette when the song changes section, a zone that drops out for a moment, dark when the music stops. There is no show to program. It is built from things you already have (zones, presets, effects and color palettes), so anything you program yourself still works next to it.
Music Mode is on the Music Mode page under Operation in the Web UI, and on the touchscreen under Music in the main menu.
Getting Started
The Getting Started card at the top of the Music Mode page walks through the setup. Each step has a green tick when it is done, or a red cross and the one button that fixes it. The card stays until every step is green; after that a Getting started checklist link opens it again, and a step that turns red brings it back by itself.
- Audio input. Plug the line input (a USB audio interface) into the unit and pick it in the list. The step is red when no input is found, when the input stops delivering sound (INPUT LOST) or when the selected input cannot be opened. On the Playback source (sounds played on the unit itself) the step is green: Music Mode follows what the unit plays. See Choosing an Audio Input.
- Input level. Play a typical song at the venue’s normal level and press Auto gain. It listens for 5 seconds and sets the input gain so the song peaks around -6 dBFS, the green part of the meter that the step shows. If the source is too quiet or too hot even at the end of the gain range, or clips before the gain, it says so: turn the source up or down at the mixer and press it again. The Input Gain slider stays on the Audio Source and Calibration card for fine tuning.
- Silence floor. Turn the music off and press Measure Room. It listens to the empty room for 5 seconds and sets the silence floor just above it, so an empty venue reads as silence and Music Mode does not dance to room noise.
- Zones. Music Mode drives zones. Go to Zones opens the Zones page to group the fixtures (bar, dance floor, stage).
- Styles. Create starter styles from my zones makes three styles, Chill, Dance and Party, from your zones, plus the music effects their looks use. A style is a Music Show.
Then press Music Mode On, or tap a style tile to run that style, and use the style sliders to make it brighter, calmer or wilder.
The starter styles look at the fixtures in each zone. Pars, bars, strips and other color or dimmer fixtures become wash zones that change look with the music, moving heads become mover zones, and fog machines and switches are left alone. A zone whose fixtures have no Fixture Type in their profile is judged by the profile’s functions (pan or tilt means a moving head). Open a style to change anything: see Music Shows.
Manual Control Always Wins
Music Mode drives the fixtures nothing else is driving. Everything you do by hand takes over and hands back:
- Presets, cues and timelines play over Music Mode. A preset applied to a zone takes that zone’s fixtures; when it is released they return to Music Mode. Cue playback wins over Music Mode looks too.
- Fixture Control and the Faders page take the fixtures you touch; Release gives them back.
- Ambient presets sit below Music Mode: while Music Mode is on it covers them, and when it turns off the fixtures fade back to the ambient look (or to black without one).
- Blackout and DMX Output off still darken everything, Music Mode included.
- The Master and zone dimmers scale Music Mode like everything else. If nothing lights up, check the Master first: a red MASTER 0% in the page header means it is at zero.
Fixtures that are not in any zone are never driven by Music Mode.
The Music Mode Page
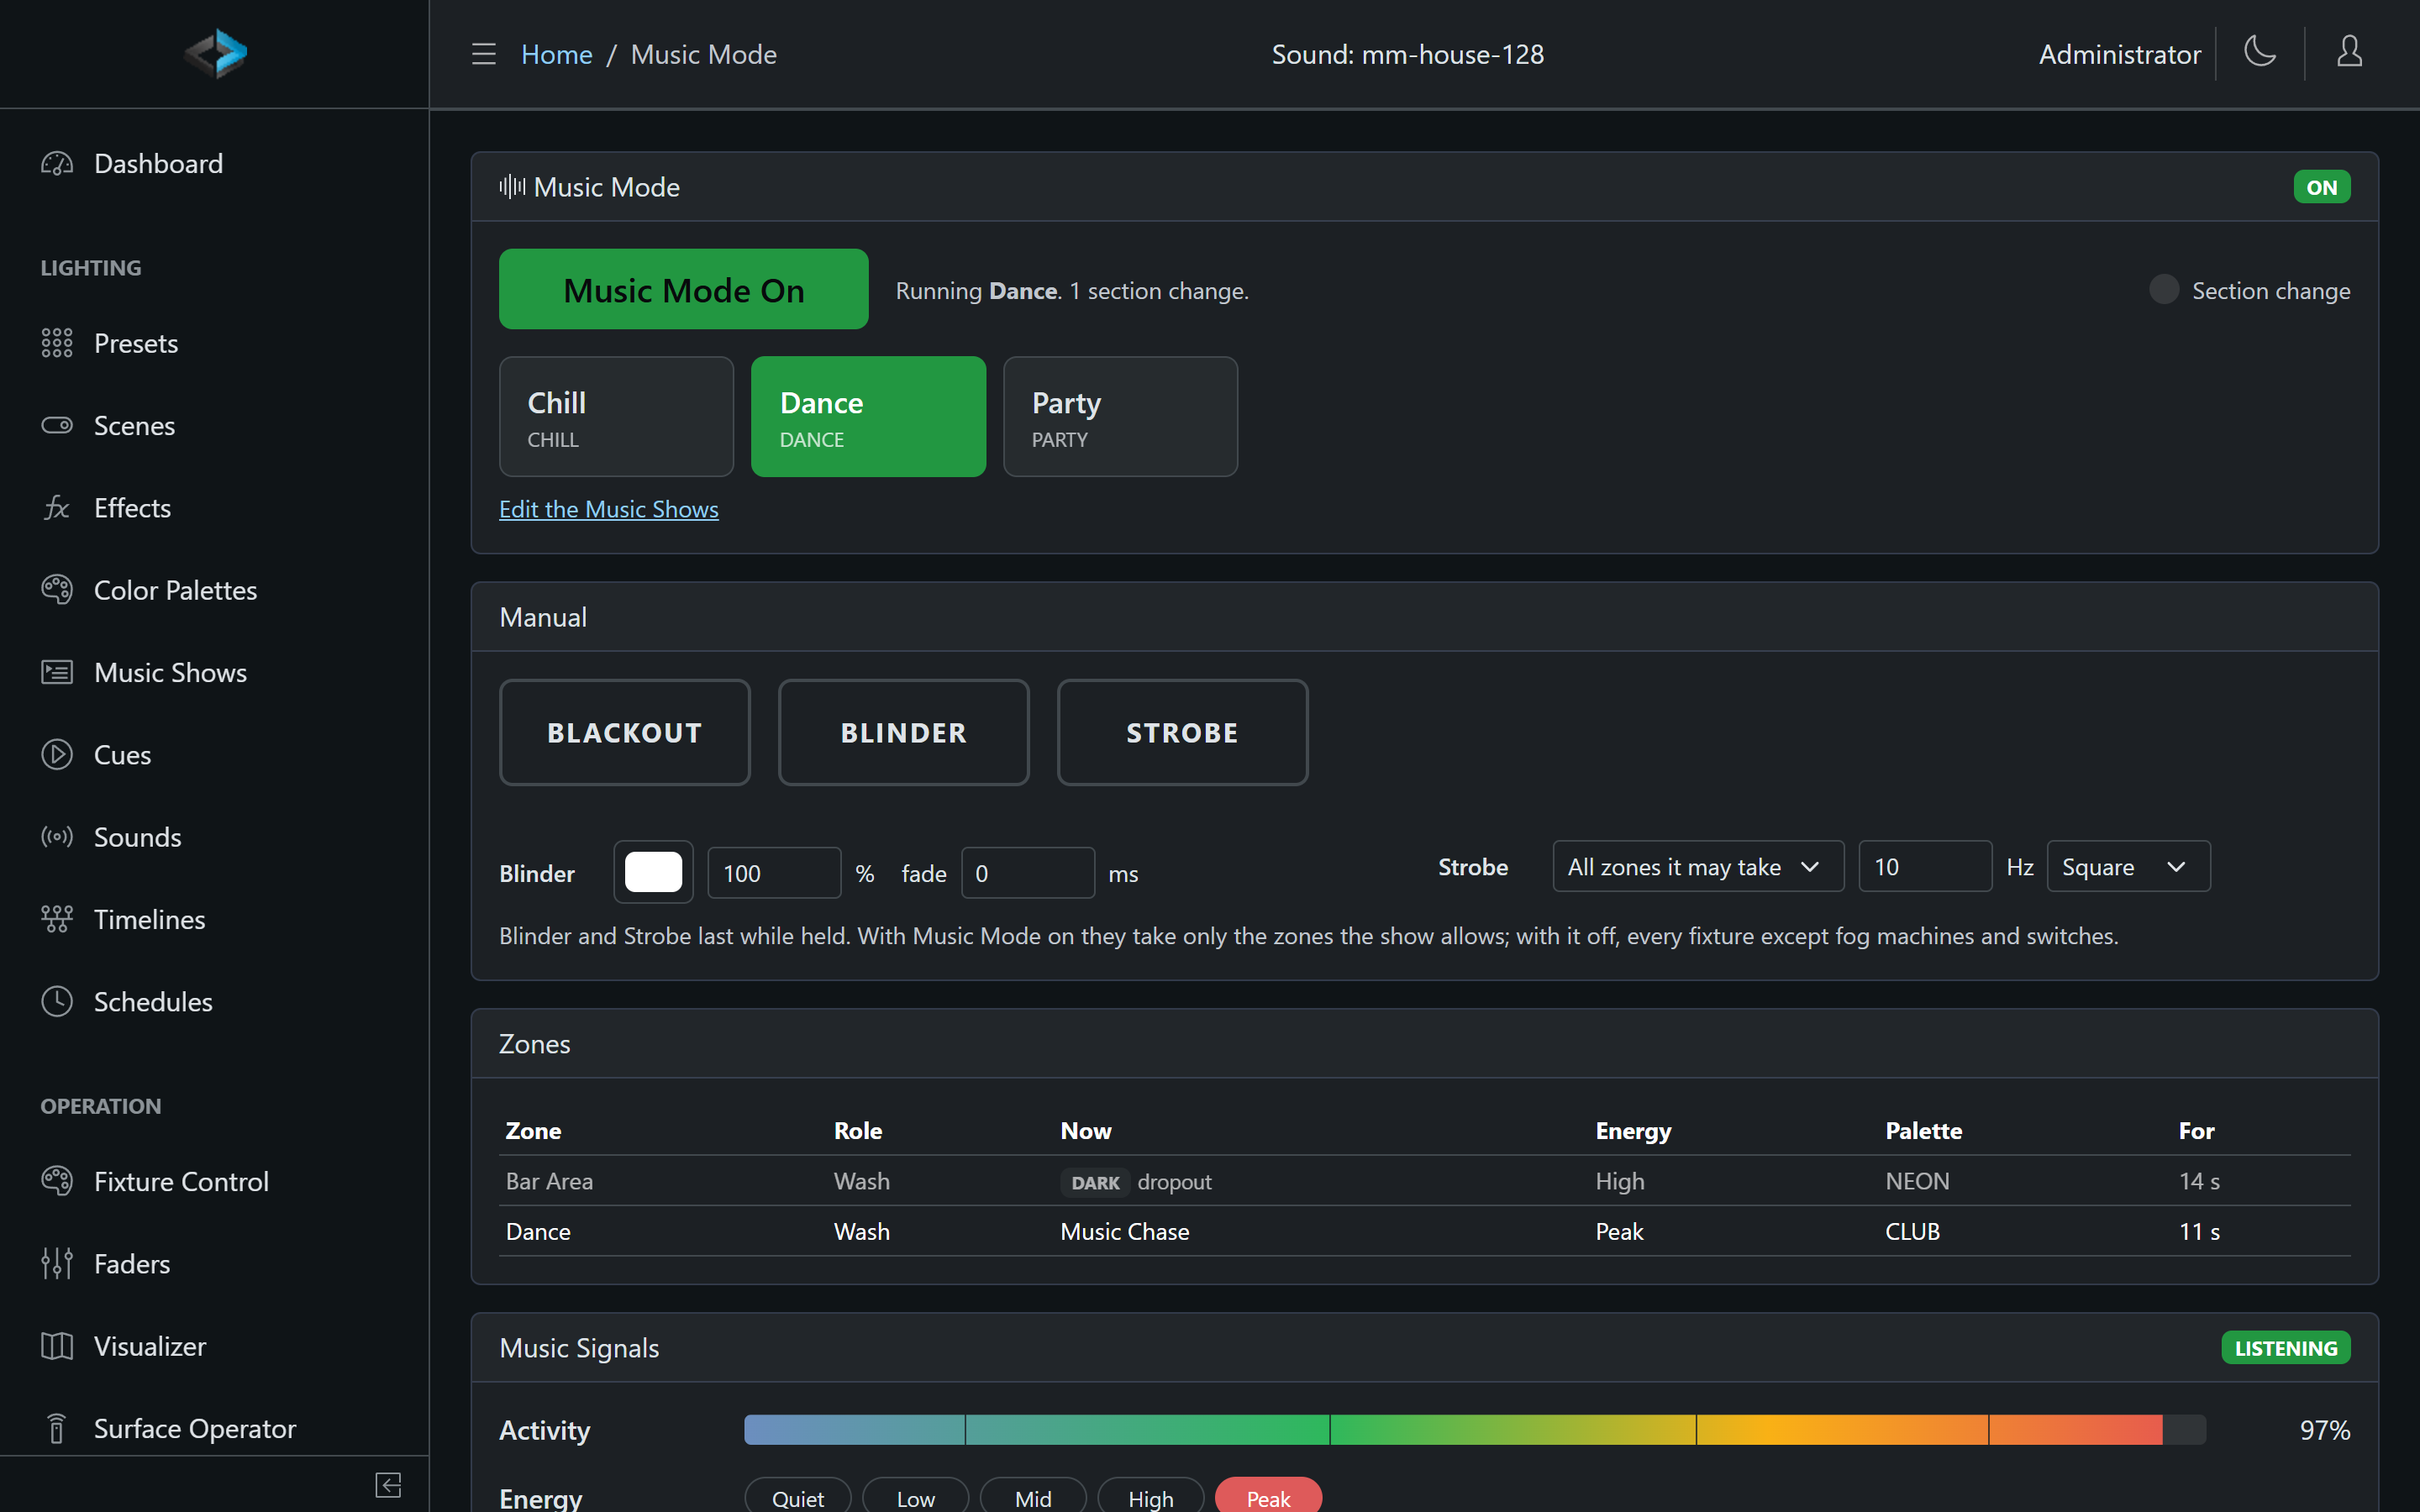
Music Mode card:
- Music Mode On / Off turns it on with the last style, or off. While it runs, the card names the style and counts the section changes it acted on (and how many came too soon after the last one, see below).
- Style tiles: tap one to run that style. The running style is lit.
- Section change flashes each time Music Mode reacts to a new section of the song.
Under the style tiles, the three style sliders of the running style (or the one Music Mode On would start).
Manual card: BLACKOUT, BLINDER and STROBE buttons that act while you hold them. Next to them, the Blinder color, brightness and fade, and the Strobe zone, rate and shape. See Blinder, Strobe and Blackout.
Zones card: one row per zone of the running style, with its role, what it shows now (a look and its effect, a preset, DARK with the reason, or Not touched for a static zone), the energy the look belongs to, its palette and for how long. A zone of the style that has no enabled fixtures is marked NO FIXTURES.
Music Signals card: the activity, energy, state and beat that Music Mode follows, the same readout as on the Tempo page.
Style Sliders
Three sliders change how a style feels without opening the Music Shows editor:
- Brightness (0 to 100%): dims every wash look of the style. It works on top of each look’s own brightness and under the Master and zone dimmers.
- Excitement (Calmer to Wilder): slows the whole style down or speeds it up. Toward Calmer, the effects run slower and react less to the energy of the music (about half at the end); toward Wilder, faster and more (about double). In the middle the looks play as built.
- Background (0 to 30%): the least light under every wash look’s effect, so a chase or a flash never takes the room fully dark mid-song. At 0 each look keeps its own background.
They are on the Music Mode page under the style tiles, on the touchscreen Music page under the tiles, and in the Music Shows editor. A change is live on the running style while you drag and is saved on the style when you let go, so it is still there after a restart. Each slider you let go of is one entry in the activity log. Dropouts and Dark while silent still take a zone dark.
How Music Mode Follows the Music
Music Mode follows the Music Signals:
- The energy of the music (Quiet, Low, Mid, High, Peak) picks each wash zone’s look. A look stays at least 8 seconds, so a short fill does not flip the room.
- A section change (a new part of the song, a drop or a breakdown) lets each zone move on to its next look, walks the style’s palette group one palette on, and sometimes makes one zone drop out. Section changes closer than 8 seconds to the last one are let pass.
- Silence (the level under the silence floor) holds each zone on its idle look, or fades it out if the style says Dark while silent. An empty room reads as silence once the silence floor is set right, so Music Mode does not dance to room noise.
- Effects in the looks keep running with the music: speed and depth follow the activity, chases step on kicks, a Wash moves to its next color on a section change. See Effects that follow the music.
Changing looks crossfades over the style’s Crossfade time (2 seconds by default). Going from one effect to another dips through the base look in the middle of the crossfade.
Blinder, Strobe and Blackout
Three buttons for the moments the autopilot cannot guess:
- Blinder: the wash zones go to white (or the chosen color) at the chosen brightness, faded in and out. With Music Mode on it takes only the zones the style allows (Blinder may take it); with Music Mode off it takes every enabled fixture except fog machines and switches.
- Strobe: the fixtures flash at the chosen rate (0.5 to 25 flashes per second) in a Square, Pulse or Random shape; a fixture that is dark flashes white. With Music Mode on it takes the zones the style allows (Strobe may take it), or one zone you pick.
- Blackout: the latched Blackout, the same as everywhere else.
On the Music Mode page and the Faders page the buttons act while held. The same three are actions for control surfaces, custom menus and input triggers, where Flash (hold) holds them while pressed and Toggle starts and stops them. Blackout and Output Off still win over a Blinder or Strobe.
Switching Styles from Anywhere
The Music Mode action turns Music Mode on, off or toggles it, optionally with a style. It works everywhere an action does:
- a control surface pad or a custom menu button per style (the pad lights while its style runs),
- a schedule such as “Friday 21:00 to 02:00: Party”,
- an input trigger (OSC, MQTT, HTTP, a contact closure),
- the Scenes panel’s style tiles, also for guests,
- the Integration API for control systems such as Bitfocus Companion and Home Assistant.
Set To decides what the action does: On turns Music Mode on (with the style if one is chosen, or the last style), Off turns it off, and Toggle turns it off when it is on and on when it is off. A Toggle with a style turns Music Mode off only when that style is running; when another style runs it switches to this one.
After a Power Cut
Music Mode remembers whether it was on, the style and where each zone was. A unit that loses power comes back in Music Mode with the same style, each zone on its saved look until the music moves it on. Looks are saved with the regular system state, so after a power cut a zone may come back on a look from a minute earlier; turning Music Mode on or off and changing the style are saved at once.
On the Touchscreen
The Music item in the main menu opens a page for running Music Mode, not for editing it:
- Music Mode: tap to turn it on or off. Its line reads out what Music Mode hears, refreshed every second, for example “Dance: 62%, Mid energy, kick”.
- A tile per style: tap to run it. The running style is lit and reads Running.
- Blackout, Blinder and Strobe (for users who may start and stop output): tap to start, tap again to stop.
- Under the tiles, the Brightness, Excitement and Background style sliders of the running style, as faders: drag the cap; the change is live and saved when you let go.
While a setup step is still to do, the line under the page title says which one, for example “No audio input”, “Input level not set”, “Silence floor not measured”, “No zones yet” or “No styles yet”. It goes away once every step of the Getting Started card is green.
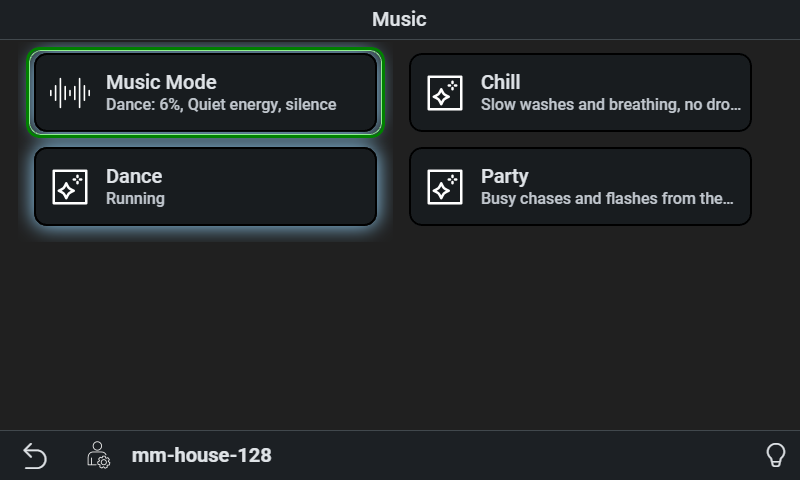
Styles and the setup are done in the Web UI.
Audio Source and Calibration
The Audio Source and Calibration card on the Music Mode page sets what Music Mode, the music signals, Music triggers and the effects with an audio sync mode listen to. It moved here from the Tempo page; the settings are the same.
- Audio Source: Playback (sounds played on the DMX Core 100) or Audio Input. The audio board and the ADIO board have no audio input; use a USB sound card or USB microphone. Pick the device, or Auto for whichever input is plugged in.
- Input Level and Input Gain (Audio Input only): set the gain so the level stays green on normal program and only touches yellow on peaks. Blue means no signal, red means the input clips. Auto gain on the Getting Started card sets it for you from a typical song.
- Levels: the frequency band meters (Bass, LMid, Mid, HMid, Treb, Air and Full).
- Sensitivity: raise it if hits are missed, lower it if extra triggers fire.
- Input Check: see below.
The badge on the card reads LISTENING, INPUT LOST when the input stops delivering sound (listening resumes by itself when it is back), or NO INPUT with the reason when the source cannot be started (it is retried automatically). Listening starts by itself while anything needs it, including while Music Mode is on.
Then set the Silence Floor on the Music Signals card (with a microphone: turn the music off and press Measure Room), so that a quiet room reads as silence.
Choosing an Audio Input
The DMX Core 100’s audio board and ADIO board are output only. To listen to music that is not played by the unit itself, plug a USB audio device into the unit’s USB port:
- From a DJ booth or a mixer (best): a small USB audio interface with a line input, such as a stereo RCA-to-USB dongle (for example the Behringer UCA202) on a spare line or booth output. A line feed hears only the music, not the crowd.
- From a live band’s mixer: a USB interface with balanced inputs (two XLR or TRS inputs) on an aux or matrix send.
- No feed available: a USB microphone near the speakers. It hears the room as well, so set the Silence Floor with Measure Room and use Input Check to confirm the music clears it.
Pick the device in Audio Input or leave it on Auto. Devices plugged in later are found without a restart, and an unplugged device is picked up again when it returns.
A hum on a line feed is usually a ground loop between the mixer and the unit’s power supply. Power the unit from a different outlet or by PoE, or put a USB isolator or a line isolation transformer in between. Input Check lets you hear whether the hum is there.
Input Check
Record 5 s records five seconds of what DMX Core hears (the input after the input gain, or the sound that is playing on the Playback source) and shows it:
- the waveform, with clipped samples marked in red; a quiet recording is drawn zoomed (the canvas says how much), the numbers keep the real level,
- the level that Music Mode compares with the silence floor, with the floor as a dashed line, and a sentence saying whether this sounds like silence, like music, or moves around the floor,
- the peak (dBFS), the RMS level, how many samples clipped, the sample rate and the device,
- a player to listen to it in the browser, and a Download link.
Use it when the lights do not react the way you expect: you hear whether the unit gets the music, a hum, a fan or just the room, and you see whether the level clears the silence floor. The recording plays in your browser only, never through the unit, and it is not stored on the unit. Support may ask for the downloaded file.
Notes
- Music Mode costs nothing while it is off; while it is on, the audio analysis runs.
- Editing a style while it runs restarts it on the new definition and keeps the zones’ looks where it can. A change to the style sliders alone does not restart it. A palette or effect edit reaches a running look at its next change.
- Several fixture types in one zone: the zone gets one role. Put lasers, derbys and moving heads in zones of their own so each can get its own role.